

UV Roller Coating Process for Solid-Color MDF Furniture Panels
 August 31, 2026
 Hits:251second
For solid-color MDF furniture panels, surface quality is determined before the final topcoat is applied. If the board is porous, dusty, uneven, or insufficiently cured between stages, the topcoat will only make these defects more visible.
A practical UV roller coating process should therefore be planned around four questions:
Does the MDF need filling?
When should sanding take place?
Is a sealer or primer required before the color coat?
When is the surface ready for the topcoat?
The correct sequence depends on the MDF surface, target gloss, coating system, and production requirements. The following process provides a reliable starting point for flat furniture panels.
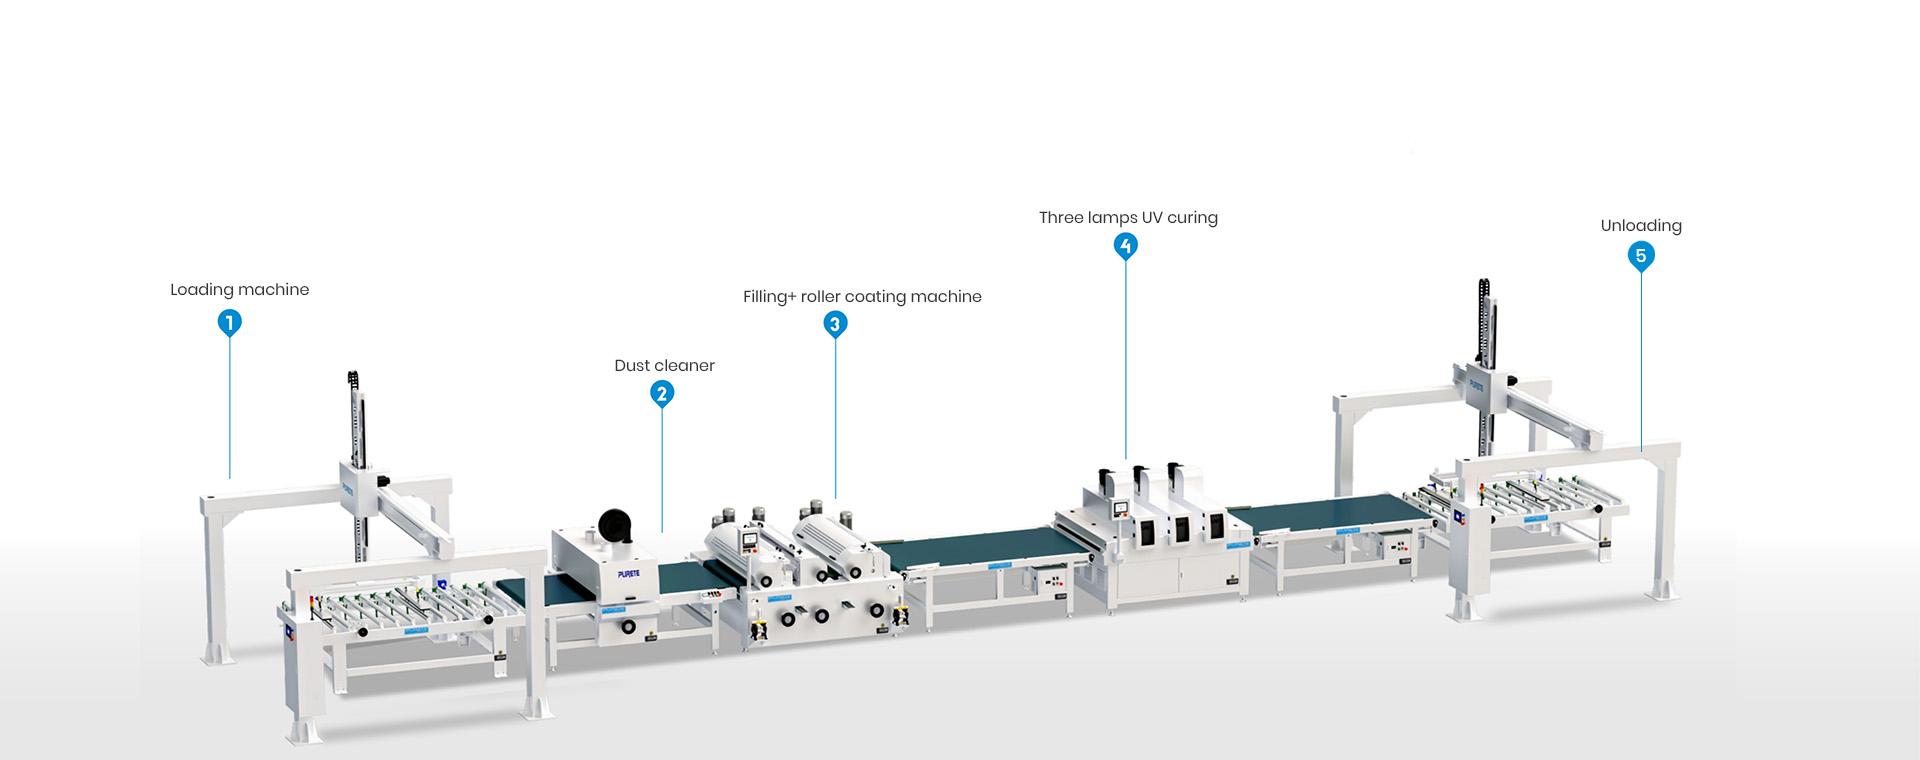
UV roller coating production line for flat MDF furniture panels
Recommended UV Roller Coating Process for MDF
For raw or porous MDF, the typical sequence is:
MDF preparation → dust removal → filling or putty → curing → sanding → sealer or primer → curing → intermediate sanding if required → pigmented basecoat → curing → topcoat → final UV curing and inspection
Pre-primed or melamine-faced MDF may require a shorter route:
Cleaning → surface inspection → local filling if necessary → adhesion primer or color coat → curing → topcoat
The purpose is not to add as many layers as possible. Each stage should solve a specific surface problem before the next stage begins.
1. When Does MDF Need Filling?
Filling is mainly used to control porosity, low-density areas, edge absorption, and small surface defects. It is especially useful when:
The MDF surface contains visible pores or fiber openings.
Panel edges absorb coating faster than the face.
The first coating shows pinholes or uneven absorption.
The final finish requires high gloss or a very smooth touch.
A solid color must hide variations in the substrate.
Filler and primer are not the same material. Filler levels the surface; primer controls absorption, improves adhesion, and creates a consistent base for the color coat.
Do not automatically apply filler to every panel. If the MDF has already been sealed or factory-primed, full-surface filling may add cost and sanding work without improving the final result. A small sample-panel test can quickly show whether filling is necessary.
The practical test is simple: after curing and sanding the filler, check whether the surface still shows open pores, edge sink, sanding marks, or uneven reflection. If these defects remain, improve the filling or sanding stage before increasing the topcoat thickness.
2. Sanding Is a Release Gate
Sanding should be treated as a quality-control gate, not simply another step in the line.
Raw MDF may receive light pre-sanding when the surface contains raised fibers or handling marks. The main sanding operation normally takes place after the filler or primer has formed a stable, cured film.
A sound sanding plan includes:
Lightly prepare the raw board when required.
Apply and cure the filler.
Sand the cured filler to remove high spots and level the surface.
Apply sealer or primer.
Sand the primer when the target gloss or smoothness requires it.
Remove all sanding dust before the next coating stage.
Avoid sanding a coating that has not reached the hardness specified by the coating supplier. Under-cured films can smear, clog the abrasive, or lose adhesion. Excessive sanding can also expose MDF fibers and recreate the absorption problem that the filler was intended to solve.
There is no universal sanding grit for every MDF coating line. Published MDF coating examples have used sequences such as 120 followed by 150 grit, but the correct choice depends on film build, abrasive type, coating hardness, and required appearance.
3. Primer, Basecoat, and Topcoat Have Different Jobs
A stable solid-color finish usually depends on separating the functions of the coating layers.
| Coating stage | Main purpose |
|---|---|
| Filler or putty | Levels pores, edges, and small defects |
| Sealer or primer | Controls absorption and improves adhesion |
| Pigmented basecoat | Builds hiding power and establishes the color |
| Topcoat | Provides final gloss, protection, stain resistance, and wear performance |
For a white, black, or other solid-color panel, the pigmented basecoat must provide consistent coverage across the entire surface. A transparent sealer alone cannot replace a properly designed color layer.
The topcoat should be applied only when the color layer is uniform, sufficiently cured, and free from dust or visible surface defects. A topcoat is not a substitute for poor filling or incomplete sanding.
An uv roller coater can be configured for filler, primer, pigmented coating, or topcoat application. However, each material requires suitable roller settings, cleaning procedures, viscosity control, and curing conditions. The same uv roller coater does not mean that every coating can be applied with identical parameters.
4. Build the Roller Coating Line Around the Handoffs
A complete roller coating line may include dust removal, filling, sanding, roller application, IR pre-drying, UV curing, material recovery, inspection, and panel handling.
The most important operating variables are:
Coating viscosity and temperature;
Wet film weight;
Roller gap and pressure;
Roller and conveyor speed;
UV lamp output and exposure;
Dust removal efficiency;
Time between coating and sanding.
A published MDF process example used a line speed of 15 m/min, a 15–20 g/m² press coat, an 8 g/m² sealer, three 8 g/m² basecoat passes, and a 23 g/m² topcoat. Sanding was performed before the first basecoat. These figures demonstrate how coating stages can be combined in one continuous process, but they should be treated as validation references—not as a universal production recipe.
PURETE’s furniture-component projects also show why effective output matters more than headline speed. One project used a 27 m line operating at 12 m/min with an 85% effective rate and a reported capacity of approximately 4,900 m² per day. Actual output depends on panel size, coating passes, curing, sanding, changeovers, and inspection time.
For more background on MDF surface differences, see the MDF, plywood, and particle board coating guide.
5. Choose the Process Route by Panel Condition
| Panel condition | Recommended approach | Main concern |
|---|---|---|
| Raw, porous MDF | Fill, cure, sand, prime, color coat, topcoat | Absorption and edge sealing |
| Pre-primed MDF | Clean, inspect, repair locally, color coat, topcoat | Layer adhesion |
| Melamine-faced MDF | Clean, adhesion treatment, coat as required | Surface compatibility |
| High-gloss MDF | Multiple leveling and sanding stages | Reflection defects and dust |
| Matte or soft-touch MDF | Controlled primer and topcoat system | Uneven sheen and surface feel |
6. Final Quality Checks
Before releasing a panel to the next stage, inspect:
Surface pores and edge absorption after filling;
Sanding marks, exposed fibers, and remaining dust;
Color coverage and visual uniformity;
Wet or dry film thickness;
Gloss at the agreed measurement angle;
Intercoat adhesion;
Scratch, stain, and abrasion resistance.
For acceptance testing, agree on the method with the customer and coating supplier. ASTM D523 is commonly used for specular gloss, while ASTM D4060 can support abrasion evaluation. ASTM D3359 should not be treated as a universal MDF adhesion test because its original scope was developed around metallic substrates.
Common Mistakes to Avoid
Filling every MDF panel without checking the substrate.
Sanding before the filler or primer is properly cured.
Applying a heavy topcoat to hide poor surface preparation.
Using spray-coating film weights for a roller process.
Increasing line speed without checking UV dose and cure quality.
Allowing sanding dust to enter the next coating station.
Treating one sample-panel result as a complete production specification.
Frequently Asked Questions
Does every MDF panel need filler?
No. Raw or porous MDF often benefits from filling, while pre-primed or faced panels may only need local repair and adhesion treatment.
Can the same line apply filler, primer, and topcoat?
Yes, a properly configured line can include multiple coating and curing stages. Each coating still requires separate process validation.
How many coats are required?
The number depends on substrate condition, coating chemistry, hiding power, target gloss, and customer requirements. There is no reliable one-size-fits-all answer.
When should the topcoat be applied?
Apply it after the color layer is uniform, cured to the required condition, sanded if necessary, and completely free from dust.
A successful UV roller coating process is not defined by the number of machines in the line. It is defined by stable handoffs between filling, sanding, priming, color coating, curing, and final inspection. If you are planning a solid-color MDF line, share the panel size, substrate condition, coating data sheet, target color, gloss level, and daily output with PURETE for a sample-panel process review.
What Is the Principle of Auto Coating Machine?

Advantages of Short-Cycle Presses in Panel Processing
Application of Soft-Touch (Excimer) Coating in Furniture and Decorative Materials
Which Industries Benefit Most from PUR Laminating?
What Is the Principle of Roller Coating Machine?
How Does PUR Laminating Compare to Solvent-Based Lamination in Terms of Cost?
Global Surface Finishing Market Analysis and Development Trends


